Over the past 10 years, mobile cameras have really jumped forward and the quality of modern smartphones are pretty amazing. This also goes for video too. Many people are no longer buying cameras, they’re just sticking with their mobile devices for taking pictures and recording videos.
No matter what kind of video you’re going to shoot. If you choose quality over quantity that’s the choice. No more shaking hands or unwanted vibrations.
What should be considered when choosing the best gimbal smartphone stabilizer? Most of all the materials, durability, ergonomics and price. Let’s look closer, we’re bringing you some of the best stabilizers on nowadays market.
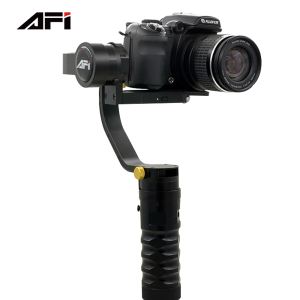
AFI–V1S 3-Axis Handheld Universal Smartphone Steady Gimbal Stabilizer for iPhone 7 and 7 Plus and Go Pro

Here it’s AFI–V1S . It’s a stabilizer gimbal for your modern smartphone. The stabilizer itself looks and feels excellentю The rubber handle is grippy and the metal construction has some nice weight. So it makes it feel like a solid overall product. Everything works really well except one design issue – when you put the weight on, it tends to sometimes bang into heads base when the system if off. So be careful and just hold it down a bit while turning off.
AFI–V1S 3-Axis Smartphone Gimbal Stabilizer Includes GoPro, Small and Larger Gimbal Cradles

This stabilizer is primarily made for the iPhone or Android smartphones. The device comes with the beautiful case with a strap, battery, stabilizer, counterbalance weight and a plug for foreign countries inside. Battery lasts around 3 hours. If you use bigger smartphones like iPhone 6+ don’t forget to attach counterweight.
If you don’t balance it absolutely perfect, the unit will constantly make some scratchy sounds. In that case, motors will be constantly working and drawing the battery down. If you feel a little buzz in your hands don’t it that way (it won’t last long). 3-Axis brush-less motor gyro system doing its job right, so no worries about picture quality here.
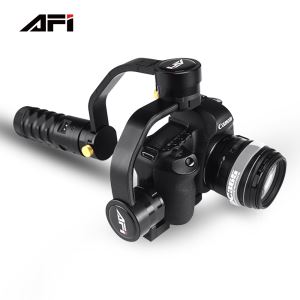
2 AFI A5 brushless motor driven steady gimbal for GoPro
The latest variant of the Afi A5 3-Axis Gimbal now supports a quick dismantling clamp instead of a permenant screw in system.
Supports for GoPro cameras and other sport cameras
The new Afi A5(quick dismantling) 3-axis handheld gimbal is suitable for Gopro4/Gopro3+/ Gopro3 and other similar size sports camera using internal limit to hide all wires enjoying extreme wireless control.
Special length design for more easy to hold and use with the second generation process system of Afi handheld gimbal process system to make more perfect filming tool.
With special thumb screw design to protect against thumb screw loss. With the new design thumb screw making A5 more steady even adding the LCD backpack.
Connecting the extension bar easier free of special switch for it. The gimbal with longer length can shoot beautiful scenery more easily.
A5 3-axis handheld gimbal offers the interfaces for power supply and video output to realize gimbal supplying the power to GoPro directly.
Simple 4 modes design to accommodate for every ground based environment.
With additional extension bar position and lightweight design, the camera will have more flexible shooting angle and broader view.

Features
Adopt excellent 3-axis stabilization technology.
5-way joystick control for directions & function modes and single button control for on-off, greatly improve user experience.
The charging port design is convenient to directly charging your action camera from the gimbal by using the charging cable.
Newly designed quick-access clip, perfectly compatible for GoPro Hero3/Hero4 and other action cameras with similar dimensions.
Standard 1/4" screw extension port, compatible with most photography equipment and accessories with 1/4" screw mount.
3. Hand-held Stabilizers Buyers Guide
Looking for stabilization for your phone, Go-Pro, camcorder, DSLR or small cinema camera? Can't decide which stabilizer is best for you and your camera? We'll take a look at the various options so you can make an informed decision before you buy.
As cameras get smaller and lighter and as the cameras in smartphones continue to improve, the need for hand-held stabilizers continues to grow. Many cameras and lenses are now including some type of image stabilization. However, for handheld shots, you often need more support. With so many different types of stabilizers and models, it can be confusing, but hand-held stabilizers, like all camera support, are designed for a purpose.
You can take a monopod, mount your camera onto it, and hold it up over your head to get high angle shots. You could collapse the leg and use it as a handle under your camera to get smother hand-held shots. Your results from trying either of these shooting techniques might not be that bad, but it’s doubtful that those results would be as good or as consistent as the ones you’d get by using the monopod for what it was intended for. Monopods are designed to provide ground support for your camera to help steady your shots.
Hand-held stabilizers are really no different than monopods in that in order to get the best results from them, it helps to understand what they were designed for. Different types of stabilizers have been designed to help get diverse types of shots. Your style of shooting and the various environments you shoot in also come into play as to what type of stabilizer will work best. It’s not about getting the best unit that will hold the weight of your camera, it’s about finding a solution to get the shots you need. Just like you may use both a monopod and a tripod at different times for the same camera, you may find you want more than one type of hand-held stabilizer.
4. Smooth Moves: How to Shoot with a Gimbal Stabilizer
Gimbals are amazing. They’re exciting to use, relatively easy to figure out, and they expand your filmmaking style and the types of shots you can acquire to a countless degree. You can add tons of production value at relatively little cost to your gear kit, all by just adding a gimbal. Immediately, your shots will reveal more life, more exploration, and more creativity.
There are definitely many nuances and subtleties that need to be taken into account before and as you’re shooting with a gimbal, though, along with the overall concepts you’ll need to get the best footage possible. And even though it’s a fun tool, it’s certainly not a toy, and doesn’t work for every application — so read on to become a gimbal ninja . Actually, there’s already a Gimbal Ninja.
Balance It Out
The most important first step to shooting with a gimbal is to get it balanced correctly. Smaller gimbals, like the DJI Osmo or the GoPro Karma Grip don’t require you to balance them beforehand, but for larger gimbals like the Mövi or the Ronin, you’ll need to get them dialed in perfectly for optimal results. Typically, this is the order of how you should balance your gimbal:
1. Front/Back Camera Balance (rough)
2. Tilt Axis Balance
3. Roll Axis Balance
4. Front/Back Camera Balance (fine)
5. Pan Axis Balance
Tweak each clamp or bracket mechanism and check the balance. Make any adjustments so that everything is perfectly level and doesn’t move after you put the camera in the position you want.
There are a few ways to carry most gimbals. While holding handles at chest height, the camera can either be upright and below the handles, or inverted and above the handles. You can also grab the center handle and go lower to the ground, and in the case of the Ronin, you can grab one of the side handles and turn it upright into “briefcase mode.”
Most of the time, your shots will be in the standard setup. It offers a ton of versatility and can accomplish almost every shot this way. When you flip it over and invert the camera (thus inverting your image), you can raise it higher above your head, so it’s good for overhead shots or higher perspectives, and can actually give the camera operator a bit of a break from the strain of standard usage. You just need to invert the footage in post.
You’ll want to use the center handle for anything where you want the gimbal to be on just one side of your body, and usually near the ground, or at least below your waist, such as following someone’s feet or rising up from the ground. “Briefcase mode” (handles pointing up and down) is also for low-angle shots, but has the added benefit of being more narrow, since the handle is now up and down. New handles and rings and all sorts of ways to carry these gimbals are also being built constantly .
Previous: AFI V2 --- One Of The Best Smartphone Gimbal Stabilizers 2017
Next: VS-3SG
Related News
- What Is The Stabilzer Key On The Ca...
- Are There Any Stabilizers For The S...
- How To Use The Three-axis Gyroscope...
- What Is A Panoramic Lens
- A Panoramic Lens Used
- Application Range/Panoramic Lens
- What Is The Name Of The Panorama?
- What Role Does A Tripod Play In SLR...
- How To Use SLR Tripod
- How To Use A Tripod 1
- AFI V2 --- One Of The Best Smartpho...
- AFI Electronic Panoramic Head MRA01
- One Of The Best Smartphone Gimbal S...
- Professional 3-axis Hand-held DSLR ...
- Top 10 Best Camera Stabilizers
- AFi-Gimbal At The 2018 India Mumbai...
- India 2018CEIF Show Live Report
- AFI V5 -The Best Smartphone Gimbal ...
- The Most Innovation Stabilizer In 2...
- AFI In 2018 LosAngeles Cine Gear Ex...